Registering A New Phone Number to WhatsApp Cloud API

Step 1: Delete an Existing WhatsApp Number from a Business Account

If your phone number has never been registered with WhatsApp, you can skip this step.

You can use a phone number that is already registered with either the WhatsApp Messenger or the WhatsApp Business App. It is important to back up your chat history from the WhatsApp Business App before proceeding. Here are guides on how to back up your chat history for Android or iOS.

  1. Open the WhatsApp Messenger or WhatsApp Business app on your Android or iPhone.
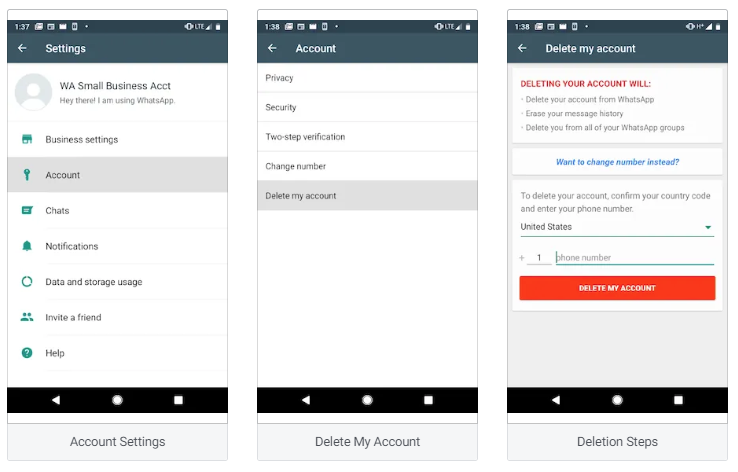
  2. Navigate to Settings > Account.
  3. Select Delete my account. Messages sent to this phone number will be queued in the meantime.
  4. Follow the prompts to delete the WhatsApp account for that phone number. It may take up to 3 minutes for the number to become available.

Note: Once you migrate a phone number to the WhatsApp Business Platform, you cannot use that number on the WhatsApp Business App concurrently. Your number must be used either on the Business Platform or the Business App.

Step 2: Register a Phone Number for WhatsApp Cloud API

  1. Navigate to the Meta App that is set up for WhatsApp by going to developers.facebook.com > My Apps > Select your App.
  2. Use the left menu to navigate to WhatsApp > Getting Started (or Setup) panel.
  3. On the right pane, select Add phone number button under Step 5: Add a phone number.
  4. Use the display name guidelines to enter a display name for your phone number. This is the name that will show for your business once approved.
  5. Select your Timezone. This will be used for WhatsApp Billing and analytics.
  6. Select a Category for your business and enter a Business description.
  7. Click Next to begin the phone number verification process.
  8. Select your country code from the dropdown and enter the phone number you would like to register.
  9. Choose how you would like to receive your verification code, either by Text Message or Phone Call, and click Next to continue. You will need access to the phone number before selecting Next to receive the verification code.
  10. Enter the verification code once received and click Next to continue.
  11. The phone number will appear in the From dropdown menu of the Send and Receive Messages section of the panel.
  12. Select the newly added phone number to begin sending messages.

If your phone number fails to register, a message will appear below the dropdown stating “Please register your phone number to send messages.” Click on the link to access the configuration screen, then click on the slider button next to Registered to register your phone number again.

Related Blogs

error: Content is protected !!
Scroll to Top